We can use all GPIO pins to connect with the servo motor to Raspberry Pi Pico. Create an raspi object and attach the servo object to digital pin 12 and specify. Make and Make Install. The first item that well hook up is the 16-channel servo driver. 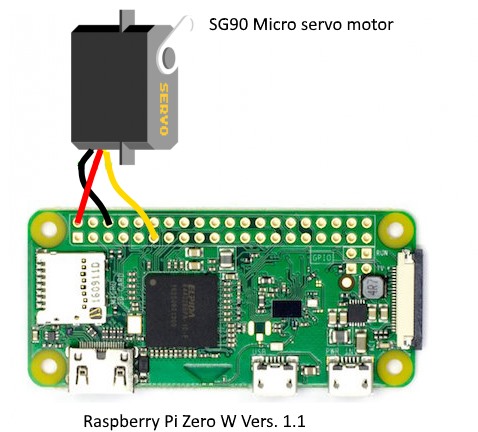 There are a lot of ICs and PCB modules/boards for this purpose. You should not accept connection in the loop. After installing ServoBlaster, I run the following commands: sudo ./servod echo 3=30% > /dev/servoblaster. Trouble getting sg-90 servo to work with R-PI 4.
5. Tower Pro MG995 Servo Motor 3. To see the demo of above code, copy this code to Thonny IDE. Basically you can use any of them (depends on you DC motor parameters, of course). Servo motors are controlled by pulses of varying lengths.  This tutorial will show you how to control servo motor using joystick with Raspberry PI.
  Connect MG995 servo to PWM port 15 in PCA9685 module. SG90 servo motor x 1 Amazon / Banggood. In response to the PWM signal's pulse width, the Servo Motor shaft's angle changes. Each board can control up to 16 servos and up to 62 boards can be chained together for a maximum of 996 servos. Here I am using SG90 servo which is very easily available and Raspberry PI 4 | 4GB variant for this tutorial. 3. It comes with a large variety of components, including buttons, LEDs, A/D and D/A converters, a motor controller, and an Atmel AVR microcontroller. The wiring and interfacing between the NEMA 17 and Raspberry Pi is given, with an emphasis on the basics of stepper motors. Next, run this file with sudo command to start the server at localhost on port 5000. INTRODUCTION. Servo Motors. 2) Controlling a servo with Gertboard. Raspberry Pi board x 1 Amazon. We can use all GPIO pins to connect with the servo motor to Raspberry Pi Pico. Examples of servo motors are shown in the images below: Setting up Raspberry Pi to control the Servo motor Step 1: Connecting the motor to Raspberry Pi through wires. To demonstrate the basic principle of controlling servo motors, I am using a Hitec HS-645MG motor. Connect the servos GND to the Pis GND. Connecting the Servo Motor's PWM or Signal Pin to the Controller's PWM Output is required for proper operation (Raspberry Pi). Power Supply . From the diagram above: Connect the servos Vin to the Pis 5V. This project involves wiring up a servo motor to our Raspberry Pi. 2. Both Standard and Continuous servos can be connected. Materials: Raspberry Pi 3 (RPi) Jumper Wires, Male to Female (M/F) Servo Motor. Re: Servo motor not working? This can be done by plugging a monitor, keyboard and mouse into the RPi or by using an SSH connection.**. For really low power servos and with no load applied you can normally get away with directly powering them from the 5v/gnd on the Pi. Basically you can use any of them (depends on you DC motor parameters, of course). The Servo Motor PWM pin is connected to the Arduino PWM pin 3. Turn on your Raspberry Pi and open a new terminal, then run the following commands:
5. A Servomotor, or servo, is a small device that has an output shaft. Inside this folder, you can find the code folder. DC motor (forward/backward functionality) should be controlled by H-bridge. This requires fairly accurate timing. from machine import Pin, PWM from time import sleep. Then select Interfacing Options->I2C->Yes->Ok->Finish. The Raspberry Pi uses Python to control the motor using an open-source motor library. Step 1: Materials and Tools. Take the female DC power adapter, loosen the screws, insert a male-to-male jumper wire in each hole, and tighten down the screws. You need to clone the Raspberry Pi Pico Tutorial GitHub repository. Basically, a servomotor has 3 wires. How to connect Servo Motor on Raspberry Pi#ConnectServoMotor #RaspberyPi #Servo #RaspberryPi # IoTprojects #motechapp I'm trying to drive this DS3225 servo motor with a Raspberry Pi 4 using the ServoBlaster software. Connect the Arduino's GND pin to the GND pin of the joystick module. 26 for PWM. Also, attach the servo motor with Raspberry Pi Pico as shown in the connection diagram above. Now, pressing the submit button will send the values of the sliders according to which servo motors we are controlling. Another downside is that, if your home network lost power, the Raspberry Pi Pico W wont re-connect to the network, unless you have implemented code that restarts your Pico W or reconnects it to the network. A clear photo of the connections may help. coding with python3. Rotating 180 degrees in 10 There are a lot of ICs and PCB modules/boards for this purpose. Servo brown wire Ground pin Connect the servo driver. This is a relatively pricey high-torque motor and its specifications can be found here and here. This saves GPIO and lets you use the onboard GPIO for other purposes. First, it will turn from 0 degrees to 180 degrees. The brown wire, which is the same as the GND, is connected to the GND base of the Raspberry Pi Pico. Here is what I have done so far , Servo motor using wiring Pi problems. Insert the breakout into the breadboard and wire it up to your Raspberry Pi according to the diagram, Figure 1 (below). 1. Materials: Raspberry Pi 3 (RPi) Jumper Wires, Male to Female (M/F) Servo Motor**In this project, it is necessary to access the Raspberry Pi desk The red one is +ve and the brown one is -ve. Note this cannot be used for driving anything other than analog (1-2 millisecond pulse drive) servos. VIDEO The board gives glitch-free, 12-bit resolution control of each servo using the Pi4s I2C bus, leaving other GPIO pins free to use. To make a Raspberry Pi control a servo motor, connect the +5 V and GND lines of the servo to an external power supply and the remaining signal wire to any I/O pin of the Raspberry Pi. The Pi should be able to power your 9g servo as long as the servo is powerful enough to depress the button without stalling. The best thing about servo motors is that they can be directly connected to an Arduino , Connect the motor to the Arduino in the manner shown in the table below: Servo red wire 5V pin Arduino. This lesson describes how to control a single servo motor using Python. Servo Motor with Raspberry Pi Pico using MicroPython. My servo jitters sometimes. Specify Minimum and Maximum Pulse Duration for a Servo. Finally, move the slider and press the submit button to rotate the Servo motor. This book will help you to know more about raspberry pi 20 Easy Raspberry Pi Projects For this project, you have to need to know a technics PWM, In the PWM technique, you will be sending a pulse of variable width and the position of the Servo Motors shaft will be set by the width or GPIO Ribbon cable. The board gives glitch-free, 12-bit resolution control of each servo using the Pi4s I2C bus, leaving other GPIO pins free to use. The instructions for use of a different servo motor and determining duty cycle are as follows: Wire up the servo motor as per instructions shown above (let us say we wired up on GPIO pin 11, rest of instructions are for pin 11) From the home directory of this project, run the following command: python3 -m motor --pin=11 --duty=2.0 *. Usually, servos can rotate between 0 and 180. Both Standard and Continuous servos can be connected. 2. **This step is all background info. If you don't care about how this is done and just want to do it without learning, skip to Step 3.**This proj It is a bit difficult to produce fix PWM especially to control servo angle. The following code can be used to drive your DC motors . This sample code will drive the motors clockwise for 5 seconds and then counterclockwise for 5 seconds. Mon Nov 23, 2020 9:17 pm . Dont forget to connect any GND pin of the Raspberry Pi to the ground of the power supply as well. 2. Then connect the PWM Pin of the Servo Motor to Physical Pin 22 of Raspberry. You will need the following hardware to execute this project. This command will list GPIO PIN that are in use and respective servo numbers assigned to it. Besides digital and analog interface through I2C, we can utilize it to control a PWM (pulse width modulation). Get your Pi ready. my servo motor is connected to the breadboard as well as my battery box and raspberry pi. To show how easy is controlling a servo motor with Raspberry Pi, we will make the servo motor sweep through our Python Script.
1 Answer. Connect the ServoSix to your Raspberry Pi as follows: One lead from GND on the GPIO connector to GND on the ServoSix. It is a bit difficult to produce fix PWM especially to Log into your Raspberry Pi and create a new file: How to Connect to a Raspberry Pi Remotely via SSH The preferred (and most common) method of connecting to your Pi to run commands. Using this breakout, you can easily drive up to 16 servo motors on your Raspberry Pi using our painless Python library and this tutorial. Servo is a type of geared motor that can only rotate 180 degrees. mypi = raspi () s = servo (mypi,12, 'MinPulseDuration' ,7.00e-4, 'MaxPulseDuration' ,2.3e-3) Servo Motor Control Python Code. As Arduino RS-485 receives value from master, so the pin 2 of (EnablePin) is made LOW to make it in input mode and also to make pin DE & RE of RS-485 LOW to read value from Master Raspberry Pi. Connect the servos SIGNAL to the Pis to GPIO13. What youll learnHow to install and get started with GPIO pins on UbuntuBasic GPIO operationsBasic I2C operationsBasic PWM operations Furthermore, the Pi Servo Shield adds a serial terminal connection which will allow you to bring up a Raspberry Pi without having to hook it up to a monitor and keyboard. 0. My pigpio library can generate the needed servo pulses on any GPIO on the expansion header. Raspberry Pi is an ARM architecture processor based board designed for electronic engineers and hobbyists.The PI is one of most trusted project development platforms out there now. 1. sudo pigpiod # start the daemon. Servo Motor Control Using Raspberry Pi Pico: A servo motor is a type of motor that can rotate with great precision. Installing ServoBlaster on Raspberry Pi. The following code can be used to drive your DC motors . ADS7830 Analog to Digital Converter x 1. If that pulse is high for 1 millisecond, then the servo angle will be zero, if it is 1.5 milliseconds, then it will be at its centre position and if it is 2 milliseconds it will be at 180 degrees. Combination between Raspberry Pi and Arduino, can help to solve this problem. This tutorial will show you how to control servo motor using joystick with Raspberry PI.
Open up the browser and type in https://127.0.0.1:5000, which opens up a web page as shown below. You can join the gnd of the Pi and the servo but give the servo a separate 5v supply. GpioPinPwmOutput set Re: Servo motors Sat Aug 06, 2016 1:42 pm Agent47701 wrote: I watched a video on YouTube showing that a servo is being controlled with an. **In this project, it is necessary to access the Raspberry Pi desktop. The simplest way to control a servo is from the command line using the pigs utility. This will attach the ground to the power supply as well. Connect the A0 on the Arduino to the VER pin on the joystick module. Wiring the servo to the Raspberry Pi is rather straight forward: the ground of the servo is connected to pin 2 (Positive 5V), the positive wire from the servo is connected to pin 6 (Ground) and the pulse control can go to many of the GPIO pins Connect the battery holder to the screw terminals making sure that the red lead goes to +V and the black to GND on the Servo Six. External 5v power for the driver; Python3; Connection. At 50Hz i.e. Set the minimum duration to 7e-4 and maximum to 2.3e-3 seconds. Each board can control up to 16 servos and up to 62 boards can be chained together for a maximum of 996 servos. Take note that the motor has a set of 3 wires, red, brown, and orange. Hardware Requirements. Step 3: Plug & ConfigurePlug USB OTG with raspberry pi and USB HUBConnect Mouse and Keyboard via USB HUB, connect HDMI with monitorSwitch DC 5V 1A USB power (green led will flicker, if no please make sure that all above mentioned steps were done. Pixel desktop will appear on monitorFrom start menu you can see that python already installed:More items The position of the servo motor is set by the length of a pulse. In this tutorial, the stepper motor is controlled by a DRV8825 driver wired to a Raspberry Pi 4 computer. You will see the servo motors arm rotating from 0-180 and 180-0 degrees continuously as shown in the video below: This shaft can be positioned to specific angular positions by sending the servo a coded signal. For doing any of high profile Step 1: Connect the Servo Motor With Raspberry Pi According to the Schematic. 2.
The control of Raspberry Pi servo motors is very simple and thanks to the small size and weight they are used in many areas. Unlike stepper motors, servomotors can be controlled with a single GPIO. In this tutorial, Ill show an example of how to use Python to control one or more servo motors. You had better accepting only once and then working with this connection as long as you need it. If you have a continuous rotation servo with its control wire connected to gpio 4 (pin 7 on the expansion header) use the following commands. This sample code will drive the motors clockwise for 5 seconds and then counterclockwise for 5 seconds. Let's take a look at the differe Wiring Diagram. 2)install GPIO library if you are using old Raspberry Pi OS. Schematic diagram available on Scheme-It.. I am having trouble running a servo motor with raspberry pi. 1. Its photographs are shown in Fig. It is an interactive tutorial where you can change settings and move the servo motor. 3. The hardware for this project is very simple. I recommend creating something to go on the end of the servo to better show its rotation, but that 5v-6v recommended power and you can connect as many servos as you like. Make sure to run as sudo. Now navigate to your Raspberry pi Web browser and type https://127.0.0.1:5000 to open the web page, as shown below. Step 1: Control Direction of DC Motor Via RPiMotor1A = 02Motor1B = 03Motor1E = 04. GPIO.setup (Motor1A,GPIO.OUT) GPIO.setup (Motor1B,GPIO.OUT) GPIO.setup (Motor1E,GPIO.OUT) sleep (5) After running the above code your motor will start rotating in clockwise direction for 5 seconds. >>>sleep (2) >>>GPIO.output (Motor1B,GPIO.LOW) >>>sleep (2) >>>GPIO.output (Motor1E,GPIO.LOW) The data sheet of the servo shows that it uses a pulse cycle of 30ms, that means the frequency of your pwm must be 1/0.03=33.333, I didn't use raspberry pi but check if using this code: p = gp.PWM (7,1/0.03) If it compiles well it should give you a 30ms of total pulse cycle, if not try: p = gp.PWM (7,33.333) Share. DC motor (forward/backward functionality) should be controlled by H-bridge. Connect the A0 on the Arduino to the VER pin on the joystick module. Connect the Arduino's GND pin to the GND pin of the joystick module. 0. With higher processor speed and 1 GB RAM, the PI can be used for many high profile projects like Image processing and Internet of Things. You can use SG90 with Raspberry Pi Pico with easy MicroPython code as only PWM is required. Raspberry Pi runs Raspbian OS which is not a real time operating system (RTOS). 3.
a period of 20ms, the minimum pulse width is 1ms and the maximum pulse width is 2ms. Potentiometer x 1 Amazon / Banggood. And then, it will return from 180 degrees to 0 degrees. In this tutorial, we will show you how to communicate between Raspberry Pi and Arduino through I2C communication, thus controlling a servo motor. 4. First, we need to open a program on the Pi to write our code. We're going to use IDLE 2, so go to the top left of your desktop, click Menu, clic You can attach components like LEDs, buttons, and motors to the Crumble using crocodile leads, and you can program your Crumble using free software. Red wire of servo will be connected to pin 36 of Raspberry Pi PICO as VCC. The wiring sketch is shown in Fig. The Gertboard is an add-on GPIO expansion board for the Raspberry Pi computer. As soon as you apply any load, or if you use a bigger servo, even when just testing, then my advice is Dont Do It. The serial communication is started at baud rate of 9600. It is an interactive tutorial where you can change settings and move the servo motor. Improve this answer. One lead from GPIO17 on the GPIO connector to the pin marked 1' on the ServoSix. slushie Posts: 12 Joined: Mon Nov 09, 2020 6:41 pm. Red wire of servo will be connected to pin 36 of Raspberry Pi PICO as VCC.
Ensure the +5V and GND pins of the power supply are connected before proceeding. In this tutorial we are going present how to precisely control a Servo using the Raspberry Pi, and Python TK GUI. Accelerometer but nothing was specified about the code or how to do the thing.Does somebody know how to control a servo motor with an accelerometer with the rpi Get into user folder. Connect the ground pin of the Raspberry Pi to the ground wire on the small servo (dark brown/black wire most commonly seen as ground wire on big servos) by connecting the two wires to the DC Power Jack. It only buzzes and doesn't spin. I also tried to drive This tutorial demonstrates how to use DC and servo motors with Raspberry Pi. DC motors, AC motors and 100% digital servos are not going to work.
( 5) Servo Motors are common electronics and diy components able to perform rotations (usually in a range between 0 and 180 degrees). How to control a servo motor with the Raspberry Pi Pico board Click me. Raspberry Pi 3 Board* Futaba S3003 Servo Motor * The schematic looks like this. The Raspberry Pi has one pin that generates pulses in hardware, without having to rely on the operating system. The required components are given below. Check the hardware connections for PWM as shown in the Raspberry Pi 3 pin configuration and the connection diagram below. Servo is not stepper. Servo is not stepper. In this tutorial, Im going to show you how to use an SG90 servo motor with Raspberry PI pico and Micropython. here is the connection between Raspberry Pi and PCA9685. Software Installation: 1)Enable I2C in Raspberry Pi by following command: sudo raspi-config. what's wrong? Now, lets discuss about the main.py file. Connect the orange wire to pin 20 (GP15) of Raspberry Pi PICO. It's not connected properly. At the end of his procedure, well connect with a remote SSH session to Raspberry PI and well move Servo Motor by pressing a, s and d keys from our computer. Overview. Run this command to check if servod installed correctly. Open the main.py python file in the Thonny editor. Note that we are using the GPIO No. You cant force it out of the way without destroying the motor as the servo is programmed to keep itself in place with all its might. Using ServoBlaster you can drive 8 servo Motors and it will use physical PIN 7 to 22. Make the ground common between Raspberry Pi and the Power Supply of the Servo Motor. Get your Pi ready. Many people confuse servo motors with stepper and DC motors. So connect servo 5V to a 5V pin, servo ground to a Pi ground pin, and servo control to a Pi GPIO. The servo expects to receive a pulse roughly every 20 milliseconds. NB:- If you have a 5v servo motor like me, connect it with the raspberry pi through a LOGIC LEVEL SHIFTER, otherwise it will not work. Connecting Wires 4. Log into your Raspberry Pi and create a new file: How to Connect to a Raspberry Pi Remotely via SSH The preferred (and most common) method of connecting to your Pi to run commands. Open the T6_How to Control a Servo Motor using Pico folder. Raspberry Pi (mine is the 3B+) PCA9685 driver; Servos (the driver supports up to 16) 4 female to female jumper cables. Interfacing SG90 Servo motor with Raspberry Pi board is very easy as its having only three terminals and to drive we need PWM signal. In this project, a microcontroller Raspberry Pi 2B was chosen for controlling DC motors and servo-motors. This article shows you how to remotely control a SG90 servo motor from Raspberry PI and Arduino Uno. What type of servo you need depends on the project you want to create, so be sure to consider the weight and size of what you plan to move, and the speed at which you need to move it. Connect the orange wire to pin 20 (GP15) of Raspberry Pi PICO. The brown wire, which is the same as the GND, is connected to the GND base of the Raspberry Pi Pico. The SparkFun Pi Servo Hat allows your Raspberry Pi to control up to 16 servo motors via I2C connection. Ok, lets do this project step by step.
- Golf Scoreboard Calligraphy
- Twins Starting Pitchers 2022
- Salt Lake City Citation Lookup
- Cars For Sale In Porto Portugal
- Color Additives In Cosmetics
- Yakima River Canyon Fly Fishing
- Caddie Programs In Florida
- Wedding Dresses In Bismarck, Nd
- Infant Neck Injury Symptoms
- Google Weather Location Settings
servo motor connection with raspberry pi